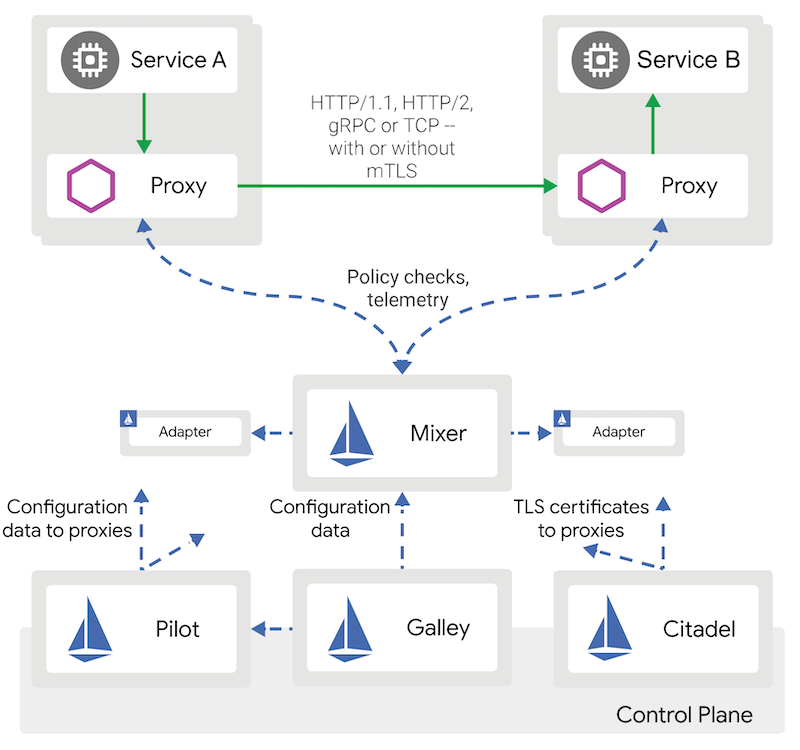
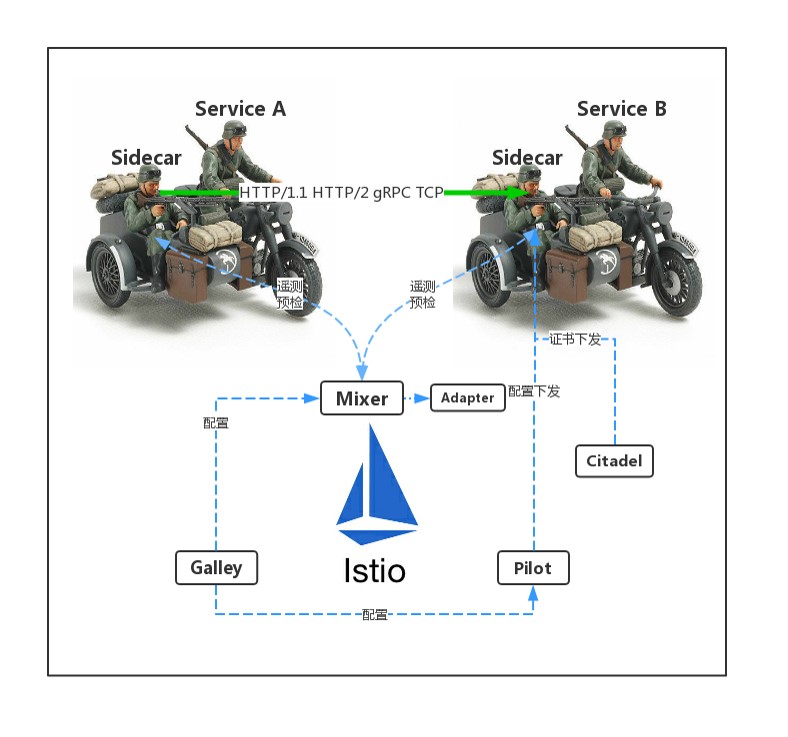
0%

有时候我们需要在 application.yaml文件中自定义配置,在程序中通过属性名映射过去,但是有时候定义错误的属性名会导致配置不生效。
属性名不能is开头,例如属性名为isLog,你在配置文件中不管怎么给这个属性设值都不会生效,需要改成log即可。

我使用spring boot版本:

<parent>
    <groupId>org.springframework.boot</groupId>
    <artifactId>spring-boot-starter-parent</artifactId>
    <version>2.0.6.RELEASE</version>
    <relativePath/>
</parent>

概要:要想k8sharbor中拉取镜像,需要有harbor的用户、密码、服务器信息,然后在k8s指定namespace中创建docker-registry类型。

前提:已经搭建K8s集群、harbor服务,且已经在机器上配置可以从harbor中拉取上传镜像。

创建docker-registry

创建docker-registry,有两种方式,命令行和YAML.

第一种方式:命令行

kubectl create secret docker-registry test-deri-registry-secret --namespace=test-namespace \ 
--docker-server=hub.test.org.cn --docker-username=test2019 \ 
--docker-password=tests12019 --docker-email=admin@harbor.com

第二种方式:YAML

需要有一台已经成功登录过harbor服务器的机器,使用命令cat ~/.docker/config.json,确认是否有harbor服务器的认证信息,例如:

{
    "auths": {
        "hub.test.org.cn:443": {
            "auth": "YWRtaW46RGVxasdXXnsada"
        }
    },
    "HttpHeaders": {
        "User-Agent": "Docker-Client/19.03.4 (linux)"
    }
}

接下来k8s也可以直接使用该认证信息,使用命令cat ~/.docker/config.json |base64 -w 0将该认证信息BASE64编码【以下示例结果都是瞎写的,请使用自己返回的结果】

[root@master ~]# cat .docker/config.json |base64 -w 0
ewoJImF1dGhzIjogewoJCSJodWIuZGVyaS5vcmcuY246NDQzIjogewoJCQkiYXV0aCI6ICJZV1J0YVc0NlJHVnlhU015TURFNSIKCHIUASDGUGDUGAUDUIAGDJIIGIUDZWFkZXJzIjogewoJCSJVc2VyLUFnZW50IjogIkRvY2tlci1DbGllbnQvMTkSDISDhi7asd56523gHGSGH

编写test-registry-secret.yaml

apiVersion: v1
kind: Secret
metadata:
  name: test-registry-secret
  namespace: test-deri
data:
  .dockerconfigjson: wraJImF1dGhzIjogeraJCSIxOTIuMTY4LjEzMC4yMyI6IHsKCQkJImF1dGgiOiAiYW5OaVpHVjJaV3h2Y0dWeU9rcHpZakV5TXpRMSIKCQl9Cgl9LAoJIkh0dHBIZWFkZXJzIjogewoJCSJVc2VyLUFnZW50IjogIkRvY2tlci1DbGllbnQvMTguMDkuMiAobGludXgpIgoJfQp9
type: kubernetes.io/dockerconfigjson

使用命令kubectl create -f test-registry-secret.yaml或者在dashboard中用上述YAML即可创建docker-registry

使用命令查看结果

kubectl get secret -n test-namespace
kubectl describe secret test-registry-secret -n test-namespace

使用刚刚创建的docker-registry

如何使用刚刚创建的docker-registry呢?两种方式:

  • 一种是每次在创建pod或者deployment时指定imagePullSecrets
  • 一种是在该namespaceserviceaccount【默认default,如果是别的serviceaccount,需要在创建pod时指定spec.serviceAccount】中指定imagePullSecrets,这样用该serviceaccount创建的pod会自动加上。
spec:
  imagePullSecrets:
  - name: test-registry-secret

第一种

每次创建pod时指定secret,例如

apiVersion: v1
kind: Pod
metadata:
  name: test-baresystem
  namespace: test-namespace
spec:
  containers:
    - name: test-baresystem
      image: hub.test.org.cn/dev-project/centos6-bare-system:v0
      ports:
      - containerPort: 8080
        hostPort: 30001
  imagePullSecrets:
    - name: test-registry-secret

第二种

以创建namespace时自动创建的serviceaccount default为例,首先查看default的详细情况:

[root@master ~]# kubectl describe sa test-deri -n test-namespace
Name:                test-deri
Namespace:           test-namespace
Labels:              <none>
Annotations:         <none>
Image pull secrets:  <none>
Mountable secrets:   test-deri-token-rmxbn
Tokens:              test-deri-token-rmxbn
Events:              <none>

可以看到当前的Image pull secrets: <none> ,需要为它指定成刚刚我们创建的secret。使用命令:

kubectl patch serviceaccount default -p '{"imagePullSecrets": [{"name": "test-registry-secret"}]}' -n test-namespace

或者使用命令:

kubectl edit sa default -n test-namespace

在打开的YAML文件中添加两行,保存退出。

imagePullSecrets:
- name: test-registry-secret

最后再次查看default的详细情况,可以看到Image pull secrets:  test-registry-secret.

[root@master ~]# kubectl describe sa default -n test-namespace
Name:                default
Namespace:           test-namespace
Labels:              <none>
Annotations:         <none>
Image pull secrets:  test-registry-secret
Mountable secrets:   default-token-5fcn5
Tokens:              default-token-5fcn5
Events:              <none>

接下来在test-namespace命名空间下用default这个serviceaccount创建的任何pods容器,都会自动在pod定义中附加上下面这样的密钥认证信息了。

最后测试一下吧。

综述

K8s中对资源的限制分以下情况:

  • namespace中容器、pod等使用总和限制
ResourceQuota
  • namespace中容器、pod等使用单独限制:
LimitRange

创建一个namespace用于测试

kubectl create namespace quota-mem-cpu-example

创建一个ResourceQuota

创建一个ResourceQuotanamespace中资源使用总和做限制,创建quota-mem-cpu.yaml

资源配额的类型

  1. 计算资源,包括cpumemory
    • cpu, limits.cpu, requests.cpu
    • memory, limits.memory, requests.memory
  2. 存储资源,包括存储资源的总量以及指定storage class的总量
    • requests.storage:存储资源总量,如500Gi
    • persistentvolumeclaimspvc的个数
    • storageclass.storage.k8s.io/requests.storage
    • storageclass.storage.k8s.io/persistentvolumeclaims
  3. 对象数,即可创建的对象的个数
    • pods, replicationcontrollers, configmaps, secrets
    • resourcequotas, persistentvolumeclaims
    • services, services.loadbalancers, services.nodeports

示例1:

apiVersion: v1
kind: ResourceQuota
metadata:
  name: object-counts
spec:
  hard:
    pods: "4"
    configmaps: "10"
    persistentvolumeclaims: "4"
    replicationcontrollers: "20"
    secrets: "10"
    services: "10"
    services.loadbalancers: "2"

示例2:

apiVersion: v1
kind: ResourceQuota
metadata:
  name: mem-cpu-demo
spec:
  hard:
    requests.cpu: "1"
    requests.memory: 1Gi
    limits.cpu: "2"
    limits.memory: 2Gi
kubectl create -f quota-mem-cpu.yaml --namespace=quota-mem-cpu-example

查看 ResourceQuota 详情:

kubectl get resourcequota mem-cpu-demo --namespace=quota-mem-cpu-example --output=yaml

ResourceQuotaquota-mem-cpu-example 命名空间中设置了如下要求:

  • 每个容器必须有内存请求和限制,以及 CPU 请求和限制。
  • 所有容器的内存请求总和不能超过1 GiB
  • 所有容器的内存限制总和不能超过2 GiB
  • 所有容器的 CPU 请求总和不能超过1 cpu
  • 所有容器的 CPU 限制总和不能超过2 cpu

创建一个LimitRange

创建一个LimitRange,对namespacepod、容器设置单独的默认限制

创建limits.yaml

apiVersion: v1
kind: LimitRange
metadata:
  name: mem-limit-range
spec:
  limits:
  - default:  # default limit
      memory: 512Mi
      cpu: 2
    defaultRequest:  # default request
      memory: 256Mi
      cpu: 0.5
    max:  # max limit
      memory: 800Mi
      cpu: 3
    min:  # min request
      memory: 100Mi
      cpu: 0.3
    maxLimitRequestRatio:  # max value for limit / request
      memory: 2
      cpu: 2
    type: Container # limit type, support: Container / Pod / PersistentVolumeClaim
kubectl create -f limits.yaml --namespace=limit-example

查看一下在该 Namespace 中被强加的限制

kubectl describe limits mylimits --namespace=limit-example

CPU和内存的单位

  • CPU的测量单位是cpus,允许分数值。你可以使用前缀m来表示mili(千分之一)。例如100mcpu就是100 milicpu,等价于0.1CPU
  • 内存的测量单位是字节。你可以使用纯整数来表示内存,也可以使用一些前缀:E, P, T, G, M, K, Ei, Pi, Ti, Gi, Mi, Ki.

创建pod时,指定资源限制

apiVersion: v1
kind: Pod
metadata:
  name: quota-mem-cpu-demo
spec:
  containers:
  - name: quota-mem-cpu-demo-ctr
    image: nginx
    resources:
      limits:
        memory: "800Mi"
        cpu: "800m" 
      requests:
        memory: "600Mi"
        cpu: "400m"
      

需求:需要为每个项目组在K8s集群中创建不同的namespace,然后为这个namespace创建单独的ServiceAccount,这个ServiceAccount需要拥有这个namespace的完全控制权。以下均通过YAML文件的方式创建。

创建namespace

打个标签,代表是测试用的

apiVersion: v1
kind: Namespace
metadata:
  name: test-deri
  labels:
    name: test

创建ServiceAccount

注意指定namespace

apiVersion: v1
kind: ServiceAccount
metadata:
  name: test-deri
  namespace: test-deri

创建role

创建role,两种方式:

  • 第一种,需要依次指定apiGroupsresourcesverbs,便于权限的细粒度控制,
  • 第二种通过通用符 * 设置所有权限,非常方便。

第一种

kind: Role
apiVersion: rbac.authorization.k8s.io/v1beta1
metadata:
  namespace: test-deri
  name: pod-reader
rules:
  - apiGroups: [""] # The API group "" indicates the core API Group.
    resources:
    - configmaps
    - secrets
    - nodes
    - nodes/metrics
    - nodes/stats
    - nodes/log
    - nodes/spec
    - nodes/proxy
    - pods
    - services
    - resourcequotas
    - replicationcontrollers
    - limitranges
    - persistentvolumeclaims
    - persistentvolumes
    - namespaces
    - endpoints
    - proxy
    verbs:
    - list
    - watch
    - get
  - apiGroups:
    - extensions
    resources:
    - daemonsets
    - deployments
    - replicasets
    - ingresses
    verbs:
    - list
    - watch
  - apiGroups:
    - apps
    resources:
    - statefulsets
    - daemonsets
    - deployments
    - replicasets
    verbs:
    - list
    - watch
  - apiGroups:
    - batch
    resources:
    - cronjobs
    - jobs
    verbs:
    - list
    - watch
  - apiGroups:
    - autoscaling
    resources:
    - horizontalpodautoscalers
    verbs:
    - list
    - watch
  - apiGroups:
    - authentication.k8s.io
    resources:
    - tokenreviews
    verbs:
    - create
  - apiGroups:
    - authorization.k8s.io
    resources:
    - subjectaccessreviews
    verbs:
    - create
    nonResourceURLs: []

第二种

kind: Role
apiVersion: rbac.authorization.k8s.io/v1beta1
metadata:
  namespace: test-deri
  name: pod-reader
rules:
  - apiGroups:
    - '*'
    resources:
    - '*'
    verbs:
    - '*'

创建RoleBinding

将创建的roleserviceaccount绑定

# This role binding allows "test-deri" to read pods in the namespace "test-deri"
kind: RoleBinding
apiVersion: rbac.authorization.k8s.io/v1beta1
metadata:
  name: read-pods
  namespace: test-deri
subjects:
  - kind: ServiceAccount # May be "User", "Group" or "ServiceAccount"
    name: test-deri
roleRef:
  kind: Role
  name: pod-reader
  apiGroup: rbac.authorization.k8s.io

查看token

查看创建ServiceAccount时自动创建的Secret Token,查看ServiceAccount名称开头的token

kubectl get secret -n test-deri
kubectl describe secret test-deri-token-xxxxx -n test-deri

使用该token登录dashboard,可以查看、使用刚刚创建的namespace,但是没有权限访问别的namespace,这样就做到了权限控制。

安装haproxy

参考Haproxy安装使用

安装keepalived

yum install keepalived -y

修改keepalived配置文件

默认配置文件目录:/etc/keepalived/keepalived.conf

global_defs {
   router_id consul1    #虚拟路由名称
}
 
vrrp_script chk_haproxy {
    script "killall -0 haproxy"     #使用killall -0检查haproxy实例是否存在,性能高于ps命令
    interval 2    #脚本运行周期
    timeout 2    #每次检查的加权权重值
    fall 3
}
 
vrrp_instance haproxy {
    state MASTER     #本机实例状态,MASTER/BACKUP,备机配置文件中请写BACKUP
    interface ens33    #本机网卡名称,使用ifconfig命令查看
    virtual_router_id 51    #虚拟路由编号,主备机保持一致
    priority 100    #本机初始权重,备机请填写小于主机的值(例如100)
    advert_int 1        #争抢虚地址的周期,秒
    authentication {
        auth_type PASS
        auth_pass 1111
    }
    virtual_ipaddress {
        192.168.41.150    #虚地址IP,主备机保持一致
    }
    track_script {
        chk_haproxy        #对应的健康检查配置
    }
}

启动keepalived服务

主备机配置完成后,均启动keepalived服务

systemctl  start keepalived.service

检查主备机网卡上是否有VIP

执行命令:ip addr sh ens33

2: ens33: <BROADCAST,MULTICAST,UP,LOWER_UP> mtu 1500 qdisc pfifo_fast state UP group default qlen 1000
    link/ether 00:0c:29:e8:3f:ba brd ff:ff:ff:ff:ff:ff
    inet 192.168.41.129/24 brd 192.168.41.255 scope global noprefixroute ens33
       valid_lft forever preferred_lft forever
    inet 192.168.41.150/32 scope global ens33
       valid_lft forever preferred_lft forever
    inet6 fe80::999f:e60:1951:9d4d/64 scope link tentative noprefixroute dadfailed 
       valid_lft forever preferred_lft forever
    inet6 fe80::d5e3:a2fa:a42:31d3/64 scope link noprefixroute 
       valid_lft forever preferred_lft forever

测试

  • 停止haproxy服务,查看VIP是否转移
systemctl  stop haproxy.service
  • 停止keepalived服务,查看VIP是否转移
systemctl  stop keepalived.service

yum安装

yum update
yum install haproxy

修改haproxy配置文件

默认目录:/etc/haproxy/haproxy.cfg,下面是一些参考配置

#---------------------------------------------------------------------
# Global settings    
#---------------------------------------------------------------------
global    #全局配置文件
    log         127.0.0.1 local2        #日志配置,所有的日志都记录本地,通过local2输出
    maxconn         20000
    ulimit-n	16384
    #chroot      /var/lib/haproxy        #改变haproxy的工作目录
    #pidfile     /var/run/haproxy.pid    #指定pid文件的路径
    maxconn     4000                    #最大连接数的设定
    #user        haproxy                 #指定运行服务的用户
    #group       haproxy                 #指定运行服务的用户组
    daemon
 
#---------------------------------------------------------------------
# common defaults that all the 'listen' and 'backend' sections will
# use if not designated in their block
#---------------------------------------------------------------------
defaults
     
    mode                    http                  #默认使用协议,可以为{http|tcp|health} http:是七层协议 tcp:是四层 health:只返回OK
    log                     global                #全局日志记录
    option                  httplog               #详细记录http日志
    option                  dontlognull           #不记录空日志
    option http-server-close                      #启用http-server-close
    option forwardfor       except 127.0.0.0/8    #来自这些信息的都不forwardfor
    option                  redispatch            #重新分发,ServerID对应的服务器宕机后,强制定向到其他运行正常的服务器
    retries                 3                      #3次连接失败则认为服务不可用
    timeout http-request    10s                    #默认http请求超时时间
    timeout queue           1m                     #默认队列超时时间
    timeout connect         10s                    #默认连接超时时间
    timeout client          1m                     #默认客户端超时时间
    timeout server          1m                     #默认服务器超时时间
    timeout http-keep-alive 10s                    #默认持久连接超时时间
    timeout check           10s                    #默认检查时间间隔
    maxconn                 3000                   #最大连接数
 
######## 监控界面配置 #################
listen admin_status
        # 监控界面访问信息
        bind 0.0.0.0:8888
        mode http
        #自动刷新时间
        stats refresh 30s
        # URI相对地址
        stats uri /
        # 统计报告格式
        # stats realm Global\ statistics
        stats realm welcome login\ Haproxy
        # 登录账户信息
        stats auth admin:123456
        #用来隐藏统计页面上HAProxy 的版本信息
        stats hide-version
        #通过设置此选项,可以在监控页面上手工启用或禁用后端真实服务器
        stats admin if TRUE
        ########frontend配置##############
 
######## mysql负载均衡配置 ###############
listen mysql
        bind 0.0.0.0:3306
        mode tcp
        # 负载均衡算法
        # static-rr 权重, leastconn 最少连接, source 请求IP, 轮询 roundrobin
        balance roundrobin
        # 日志格式
        # option tcplog
        # 在 mysql 创建一个没有权限的haproxy用户,密码为空。 haproxy用户
        # create user 'haproxy'@'%' identified by ''; FLUSH PRIVILEGES;
        # option mysql-check user haproxy
         # 这里是容器中的IP地址,由于配置的是轮询roundrobin,weight 权重其实没有生效
        server mysql_1 192.168.41.129:3306 check weight 1 maxconn 2000
        server mysql_2 192.168.41.130:3306 check weight 1 maxconn 2000
        server mysql_3 192.168.41.131:3306 check weight 1 maxconn 2000
        # 使用keepalive检测死链
        # option tcpka
#########################################
 
 
########test1配置#################
# listen test1
#         bind 0.0.0.0:8008
#         mode tcp
#         balance roundrobin
#         server s1 127.0.0.1:8010 weight 1 maxconn 10000 check inter 10s
#         server s2 127.0.0.1:8011 weight 1 maxconn 10000 check inter 10s
#         server s3 127.0.0.1:8012 weight 1 maxconn 10000 check inter 10s
 
########test2配置#################
# listen test2
#         bind 0.0.0.0:8007
#         mode tcp
#         balance roundrobin
#         server s1 192.168.1.88:8010 weight 1 maxconn 10000 check inter 10s

修改ulimit配置

haproxy要求ulimit大于(maxconn*2 + 15 )

#临时修改
ulimit -n 65536
 
#永久修改,需要修改/etc/security/limits.conf配置文件,文末增加以下内容,然后重新登录就可以生效
* soft nofile 65536
* hard nofile 65536
* soft nproc 65565
* hard nproc 65565

启动服务并配置自启动

启动后访问8888端口,使用admin/123456登录就可以看到UI界面了。

systemctl start haproxy
systemctl enable haproxy